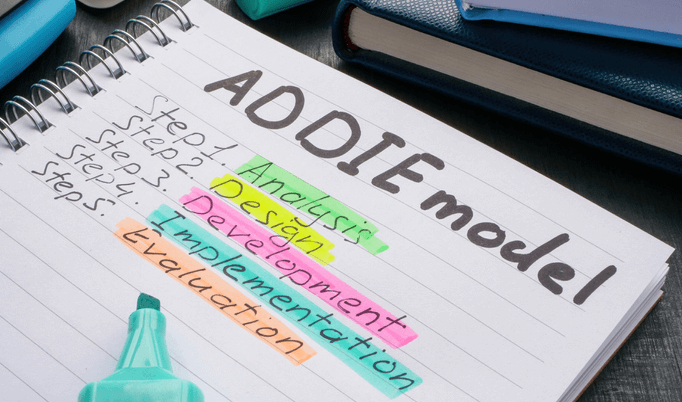
The ADDIE model, first introduced in the 1970s, has withstood the test of time and remains a widely preferred instructional design model. Its highly effective, straightforward approach makes it a top choice when creating learning content.
After a stakeholder meeting, you’re tasked with creating a new training initiative. They want a problem solved, and staff training is the solution.
You’ve been here before, and you know the importance of creating quality training. Successful training needs all of its elements to work well together— content that has been thoughtfully designed, knowledgeable facilitators, and the right training platform for delivering that content to every team member.
The ADDIE model is clearly a winning choice. Here we’ll explore what does ADDIE stand for, its five step process, and why it’s easily repeatable.
What is the ADDIE model?
ADDIE definition
ADDIE is an acronym representing a five-step training model. ADDIE is a training model that instructional designers and training managers use to create effective learning content. The term “ADDIE” is an acronym, with each of the five letters representing one of the steps in the framework.
What are the 5 steps of the ADDIE model?
ADDIE stands for five steps in an instructional design process:
- Analysis
- Design
- Development
- Implementation
- Evaluation
The steps are designed to be completed in this order, with each step driving the next one. This straightforward approach has been around for over 50 years, and it continues to help instructional designers build high quality learning experiences.
Analysis
Although it’s at the beginning of the ADDIE process, the analysis step is the most commonly overlooked part. When a problem comes up in a business, it’s often answered with additional training. But it’s essential to analyze the situation thoroughly before diving into training.
If you skip, or rush through this step, you risk missing the mark with your training, or using training to solve a problem that actually requires a different solution. As an instructional designer, you don’t want to take this risk because it will seem like the training you developed was ineffective, when really, training wasn’t the correct solution.
In this step you should learn more about the problem, audience, and solution. A needs assessment will uncover each of these. By conducting this assessment, you first determine what’s causing the problem.
There are situations where additional training won’t solve a problem. For example, you may be trying to streamline a process within the company, and make it more efficient. A lack of training isn’t necessarily the problem— it could be a lack of proper technology to automate repetitive processes.
Assessing needs will clarify what steps to take when solving a problem. A needs assessment is probably the most important, and least completed step in instructional design. Don’t overlook this one!
Once you’ve determined that further training is needed, it’s time to conduct a learner analysis. This analysis gathers information on the learner’s general characteristics, knowledge, and experience.Understanding the audience’s needs and expectations allows for a tailored and relatable training experience.
Finally, decide what resources you need for training. Training length, hours required, budget, and location (in-person or online) are important resources to nail down.
Once your analysis is complete, you can begin designing effective training.
Design
With a complete analysis, you can now start designing your training. A good first step is to create an instructional design document.
Your instructional design document should include the following:
- Clearly defined learning objectives
- Audience
- The training delivery method that best suits the topic and your audience
- How you’ll measure the success of your training
Some training delivery methods you can consider using include, microlearning activities, mobile training, and on-demand training.
With your design document in place, it’s time to develop the training.
Development
The development phase is when you actually create your training. Developing your training content is the most time-consuming part of the model. The main objective is to organize and present information in a meaningful way. Ensuring it’s digestible and engaging will help make your training successful.
Building, checking, and testing will take up most of your time in the development phase. A lot went into the analysis and design steps, so thoroughly review each part.
Get creative with this step by adding relevant graphics, colors, and media to engage your learners.
Test, test, test. Get eyes on your training. Look for errors and gaps that hinder your learning objectives.
Once you’ve fully developed your training, it’s time to implement it. Get ready to launch!
Implementation
You’ve done all the hard work behind the scenes, and it’s time to roll out your training.
How you deliver the learning experience depends on the results of your analysis. Choosing the right training platform helps you effectively distribute the training and monitor learner performance.
If your workforce is mainly in the field, you’ll definitely want to consider using a mobile training platform.
If your training involves courses to be completed from a laptop, you’ll want to consider an LMS.
The main goal of this step is that the rollout goes smoothly. The instructional designer should be closely monitoring the progress. An efficient training platform helps report how well things are going. The progress and success of your program is significant for what’s up next.
Evaluation
You’ve delivered your training, and it’s time for the big reveal— did it work?
You’ll know this by evaluating the learners and the facilitators (that’s you!). One of the main goals is to determine if your staff has learned what is needed to fix the original problem.
These are some of the questions to ask when evaluating the effectiveness of learning:
1. What did participants learn from the training?
- Assess learner knowledge using the most relevant method, whether that’s:
- Written assessments
- Oral assessments
- Demonstrating the ability to carry out the task
2. Are employees able to apply what they learned to their job?
- Look for key performance indicators
- Monitor and review employee performance post training
3. Is the organization experiencing improvements?
- Evaluate if the organization reports fewer accidents, increased productivity, increased sales, decreased customer complaints, etc.
4. How do participants themselves rate your training?
- Provide a post-training survey to collect feedback
Once you’ve completed your evaluation you can go back into the relevant steps of the ADDIE model and make improvements to the learning experience.
Benefits of adopting the ADDIE model
Just using the ADDIE model doesn’t mean you’ll provide quality earning. Results come from how well you develop each step.
As we mentioned before, the analysis phase is the foundation of the ADDIE model. This step forces your training managers to focus on who the learner is, and how to best deliver training. This helps them avoid creating a one-size-fits-all approach to training across a company with diverse employees.
Training managers are closing gaps in the learning process by completing the design phase. They start at the very beginning with the information gained in the previous step to flesh out training from beginning to end.
The development phase is often the starting point when creating training. With the ADDIE model, you level up the development phase by spending time working through the previous two steps. This helps ensure that your training is optimized, on-target, and effective.
How often does quality training fail to produce results, simply because it wasn’t adopted across the company? By following the implementation step you’re forced to consider the best method for distributing your training, boosting the likelihood of success.
The ADDIE model enforces evaluation. So often, this step is left out of the training process, making it a one-time event. With ADDIE, it is now a continuous effort that undergoes consistent optimization.
At its core, the ADDIE model helps you make sure that you consider each phase of the training you’re developing, and that each decision you make is intentional and merited. Once you’ve developed each step, it’s easy to go back in and improve. You’ll feel confident knowing you’ve created and provided high-quality training.
Why the ADDIE model is especially effective for training deskless employees
Despite making up 80% of the global working population, deskless employees, and especially their training opportunities, are frequently overlooked. Historically, training courses are designed with the office employee in mind— content that is meant to be consumed from a laptop, or seminars that pull staff into the same room for an extended period of time.
Neither of these training delivery methods are optimal for deskless employees whose jobs keep them on their feet and on the move throughout the day. By adopting the ADDIE model, specifically the Design step, instructional designers are forced to consider what the best delivery method is for these employees as well.
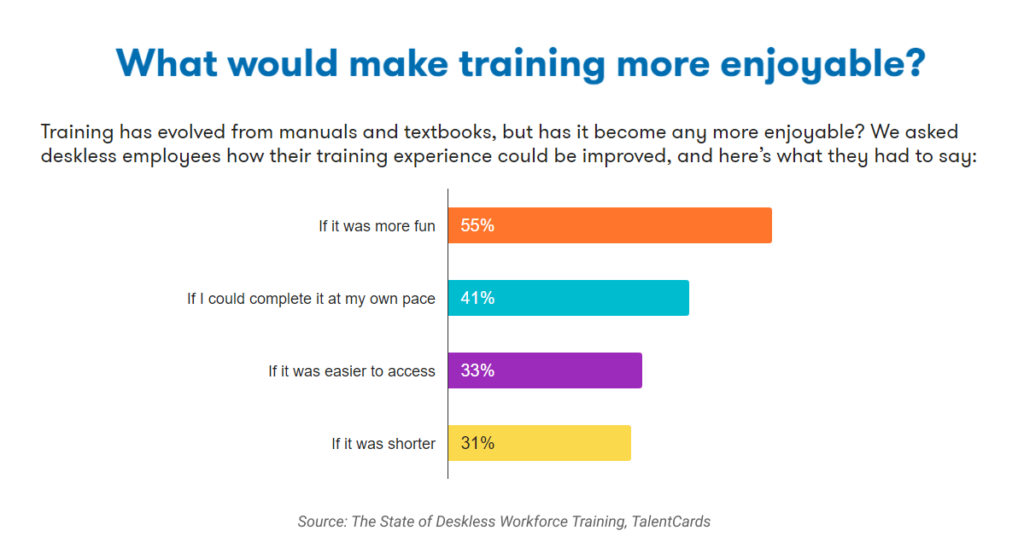
But don’t just take our word for it— 80% of deskless employees reported that they prefer short training sessions that happen at regular intervals over long, one-time training events. In fact, when asked what would make training more enjoyable for them, their top answers all revolved around the design and accessibility of the content:

Create mobile training that employees can take anywhere

FAQs
What does ADDIE stand for?
The ADDIE acronym stands for five steps in the learning model: Analysis, design, development, implementation, and evaluation.
What is the ADDIE model with examples?
The ADDIE model is a five-step training model used by instructional designers to create a learning event. An excellent opportunity to use this is during onboarding.
- Analysis: look into your current onboarding process and decide what to keep and replace.
- Design: identify what parts of onboarding happen online or in person before the start date.
- Development: rework any parts of the onboarding process that aren’t engaging.
- Implementation: use your analysis to decide how you will roll out the onboarding for your new hires. Consider if they are office, or deskless employees, and what type of delivery suits each of these best.
Evaluation: provide onboarding surveys to optimize your onboarding process continually.
How do teachers use the ADDIE model?
Teachers can use the ADDIE model when developing lesson plans. You analyze the needs of your students, design while keeping learning objectives top of mind, develop age-appropriate material, implement with your students, and evaluate using formative and summative assessments.
What are the key components of the ADDIE model?
The key components of the ADDIE model are its five steps. The steps are analysis, design, development, implementation, and evaluation. When you’re creating a training program from the ground up you should follow the steps in the specified order.
A training model to remember
The education world is full of acronyms, and ADDIE is one to remember. The model’s flexibility allows instructional designers to create tailored learning experiences that benefit the learner, and the business. There’s a reason this has served as a foundation for instructional development for so long. With the ADDIE model, you’ll feel confident that you’ve provided meaningful learning that helps your staff and organization grow.
Key takeaways
- The ADDIE definition is a training model used to create a course, training, or learning event. The model’s five steps are analysis, design, development, implementation, and evaluation.
- Each step of the ADDIE model is essential, but the analysis step is the most important. It sets up the instructional designer to provide meaningful instruction.
- The ADDIE model is especially effective for creating training for deskless employees, as it places a big emphasis on proper training delivery, which hasn’t always been top of mind for these employees.


